Thursday, February 28, 2008

Using my Cuttlebug

As I was learning how to use my Cuttlebug I was searching endlessly for a tutorial. Couldn't seem find much help on the intranet (and the store didn't seem to help much either) ... so figured I'd create my own blog entry for it!

Here's my Cuttlebug. I think I'll call her "Cutie"! It just kinda seems natural, eh?


She is made by ProvoCraft. She is compact and folds up and out of the way when not in use. (Plus she doesn't eat or make any noise! It's a great arrangement!)

The package I bought her in provided exactly what I needed to start playing as soon as I got her home. And since she doesn't require batteries - I was all set!

She came with: Spacer block "A", two cutting pads "B", thin die adapter "C", a set of small embossing folders and a set of small dies (and a user's manual of course). I was set! (The embossing folder shown here measures 5 1/2" x 4 1/4". But the size that came in the package were 2" x 2" - the same size as the small paisley dies shown here.)


Lesson #1 - Let's cut out some pretty pink paisleys! Here you layer block A, cutting pad B, die (foam side up), card stock and another cutting pad B. Then roll it right on through! It's THAT easy!


Second lesson today - using an embossing folder. And I LOVE, LOVE, LOVE flowers... Here again you layer block A, cutting pad B, embossing folder (with paper inside) and another cutting pad B. Then roll it right on through! Once again, it's THAT easy!


Sunday, February 17, 2008

One last Cuttlebug card before I call it quits for the night...


After all, I have to send these cards out - so I need some "writing" time now that I've had some crazy stampin' time (er, um... maybe I should call it a "stampin' day"?!).

Anyhow... the Soft Sky layer was another one of the first tests from my new Cuttlebug machine. And of course I had to put it to use.

Details, details...
Stamp set: Baroque Motifs and Happy Harmony
Colors: Soft Sky, Blue Bayou, and River Rock
Other: Cuttlebug embossing folder "Fancy Corners" and River Rock double-stitch grosgrain

Cuttin' it up w/ the Cuttlebug


And day #1 w/ the Cuttlebug is proving inspiring. The heart cut out layer was my first attempt at sending anything through the machine - not bad, eh?! So, I turned it into a Valentine's Day "Thank you" card.

Details, details...
Stamp set: Baroque Motifs
Colors: Purely Pomegranate, Groovy Guava and Chocolate Chip
Other: Cuttlebug embossing folder and heart die cut

CASE alert...


What's "CASE"? I wondered the same thing the first time around ... as I understand it, it appropriately stands for "Copy and steal everything"... so a loud shout out to Sher for being such a creative goddess! Thanks for ideas... I changed it up a little... but, wow. You're always an inspiration! The monochromatic look was just screaming my name today... had to do it!

And this is one I'll keep in the repertoire! I think it might even make for great anniversary cards!

Details, details...
Stamp set: Baroque Motifs and Sincere Salutations
Colors: Wild Wasabi and Certainly Celery
Other: Glossy paper, brayer

Cuttlebug Creation #1


After hearing a few people absolutely RAVE about the Cuttlebug... I finally went out and got one this weekend. Thank you, Michaels, for honoring the 50% coupon that came in the mail! I'm sure this purchase HURT YA big time!

I bought the Cuttlebug, one pack of heart dies and one pack of embossing folders ("Fancy Corners")... and voila! This is what I came up with. This uses SU paper and ribbon of course, and the embossing was done using the folders/Cuttlebug.

Wow - I'm hooked! Seriously - hooked!

Details, details...
Stamp set: Happy Harmony
Colors: River Rock, Soft Sky, Chocolate Chip
Other: Prints Designer Series Papers

It's Sunday and I've been busy this morning!


Check out the string of posts below - as you can see, I got my "stamp" on this morning!

This one was my fav creation of the day. I wanted to use the Time Well Spent hostess set for some cards to girlfriends. They rallied together yesterday and helped me out w/ a project for a friend/customer - 120 wedding invitations!

So, I wanted to put some of my heart into this card for them as a thank you. And this is what my little heart came up with. I included a close up image of the heart so you could see the glitter - than darn glitter doesn't always show up clearly in these pics.

Details, details...
Stamp sets: Time Well Spent
Colors: Soft Sky, Blue Bayou, Old Olive and Whisper White
Technique/Other: Prints Designer Series Papers, Watercolor and Dazzling Diamonds glitter

Personal scrap challenge


I sat at my stamp table this morning fully inspired (as you can see by the many posts today) ... and thought I better harness the spirit and put it to work while I had it in me. I challenged myself to use some of the scraps laying around. This is what I put together using one of my new fav sets... thanks SU! for sending this to me! You're so good to us demonstrators!

It's hard to tell from the pic, but the mulberry paper has been watercolored very lightly w/ Soft Sky ink to make it resemble some puffy clouds. And the Blue Bayou ink on the mulberry paper is also supposed to resemble clouds - not sure if it works for everyone else, but it works for me this morning! Maybe I'm just in an abstract frame of mind this morning...

Details, details...
Stamp sets: Time Well Spent
Colors: Going Gray, Old Olive, Soft Sky and Blue Bayou
Technique: Watercoloring mulberry paper

"Embossed and Drowned"...


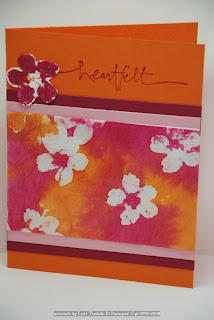
So, I don't know if there's a specific name to this technique... but I call it "Embossed and Drowned". Here's the short and quick of it... cut your mulberry paper to size, using a full/block image stamp versamark in various places, cover w/ clear embossing powder and heat as usual. Then watercolor onto the mulberry paper w/ colors that coordinate w/ your card. Simply wait until the mulberry paper dries and layer it over a piece of white paper the same size.

And I LOVE, LOVE, LOVE this technique and this color combo. My photo editting software however doesn't like the balance of these colors very much and this pic came out a little strong. But you get the point.

Details, details...
Stamp sets: Heartfelt Thanks
Colors: Pumpkin Pie, Purely Pomegranate and Pretty in Pink
Technique: Watercolor, Embossing

Your corner of the world!


Very rarely do we get snow in San Diego county. We did this past week! The meteorologists didn't even the see storm coming! Well, I made this altered lunch bag/card for a friend/co-worker who lives up in the foothills - and happened to get stuck in this surprising snow! It usually takes her about an hour to get home - on Thursday, instead it took over 4 1/2 hours to get home and almost got hit by a school bus sliding across the road on ice. Wanted to send her some warm wishes... and came up with this.

I first brayered Soft Sky ink onto the outside of the white lunch bag... then started the rest of the layering. And it's hard to tell... but the trees are dusted w/ a little bit of Dazzling Diamonds glitter.

This one was fun!

Details, details...
Stamp sets: Lovely As A Tree, Seasonal Whimsy
Colors: Old Olive, Soft Sky and Blue Bayou
Technique: Brayer background, Dazzling Diamonds glitter, blender pen

Color Mixer Challenge


I took on another challenge - the challenge was to use at least 2 of the In Colors and at least one of the standard colors. This is what I came up with... and catching up w/ my stash of girly birthday cards all at the same time.

Details, details...
Stamp sets: Voila, It's Your Birthday
Colors: Certainly Celery, Groovy Guava, Purely Pomegranate, So Saffron and Shimmery White CS
Technique: Watercolor

Saturday, February 9, 2008

Ribbon storage!

I know it's happened to you like this... so come with me for a brief journey in "DUH!"!

January rolls around... and you know what that means. That 'spring cleaning' feeling kicks in ... and you take a step back and look at things in front of you - and think, "Wow - there's GOT to be a better way to do this!" I'm not talking about any one area of my life in particular... just every thing.

So one weekend I was cleaning my stamp room - have I told you lately how much I LOVE, LOVE, LOVE my stamp room! (Just to be able to have one - I'm so grateful!) And I look at my ribbon collection... all the way over there in the corner of the room - out of reach... and I take a step back and wonder if there's a better place for them so that they are within arm's reach while I'm crafting.

And the light bulb came on. And I said to myself "See that plastic container holding your envelopes?! Hey lady - look at those perfectly sized holes - you can string ribbon through there!!!" Which then led to a thought on how to better organize my envelopes, my brads, my punches, etc... then ensued a tornado in my room... a few hours later I had a clean stamp room... and the PERFECT ribbon storage idea for my table top! Here it is...


OK - so this idea has been in front of me, in plain sight, for several years now. And had I taken a step back earlier and really looked at my options, I may have discovered this earlier. But, no... it took until now. And I'm glad it happened, finally!