Thursday, December 31, 2009

Dress it up... it's easy!

This was an idea I saw in a magazine last fall... so I broke out the adhesive and had fun with it...

Here's the necessary supplies... glass candle holder with a flat bottom (no little "feet" on the bottom), adhesive, scissors, felt, decorative cardstock of any kind, circular template and something to draw with...


Step #1... trace your template onto the back of the cardstock.


Step #2 - but since my template wasn't fit perfectly to size, I knew I had to cut just outside the traced line... so, start to cutting...


Step #3 - Use adhesive to attach the card stock to felt. I used glue.


Step #4 - Cut out your two layers of cardstock/felt. This is now ready to be attached to the underside of the candle holder! That's how easy this is...


See how pretty?! How easy?! What a great gift this makes... too bad I didn't finish any for Christmas presents! hmph...


Tip from Lori: next time I make this, I would try to use a thicker cardstock than just scrapbook paper. The glue made the paper warp a little... and while you can't really tell (because it's laying flat, and a candle will be on top of it... ) I would know. So, the next one I make will have a heftier cardstock. I'll post pic when done...


Wednesday, December 30, 2009

MERRY CHRISTMAS and HAPPY NEW YEAR!


It's that time of year... we're pulling down the Christmas decorations and cleaning up the house. Some times we stop and re-read some of those Christmas cards.

Above is a picture of one of the cards that we sent out this year... I sure had fun making these while on vacation (in Oregon, in October). This year there were 3 different designs... and I handmade made about 140 cards. Wow... that's a lot of adhesive!

Welcome 2010! We've been waiting for you!


Sunday, November 29, 2009

Wow... I have so much to post! But most of it is related to Christmas presents. And I just can't ruin any surprises... so I might be quiet around here for a while.

And it's killing me...


Let the bells ring... Christmas is in the air!


Saturday, November 21, 2009

Labels x3

It's time to think about holiday baking... and what we want to eat... and holiday parties... and what we're going to serve for snacks and sweets... and so I pre-made some labels.

Really, I just posted these pics for my Mom's benefit ('cuz if she does then I'm going to send them to her for HER party and HER desserts).

So, what do ya say, Mom? Like them? Should I make more? Or would you prefer different colors? In total, how many # would you like?


This first one is meant to look a little like a Christmas package (made of a burgundy colored card stock).... there is bronze cord wrapped around the "package" with a nice label on top of the box and some cute flower embellishments.


This cute label uses razzleberry and mossy colors to match your house - you like?!


And the third one - I know you love this turquoise color and it is complimented well with a sage green in the background (although I think the flash made it look more gray). It's really pretty in person.

And when you click on the pictures above it will enlarge the picture for you. See the glitter I added to each one? Really, pretty detail... don't you think?!

Say the word - I'll drop them in the mail to you... just let me know the names of the desserts you are making and I'll get the labels done too!


Sunday, November 1, 2009

Thinking about Christmas...

We are currently on vacation... and we're doing exactly what we want to be doing. My dear husband is surfing the net (reading music blogs, posting on musicians forums and reading the news), my Grandparents are playing "chicken foot" and me? I'm stamping...

We're fortunate enough to go on vacation and do what we want to be doing...


I worked hard to get my supplies ordered and delivered just in time to pack it up for our road trip to the Pacific Northwest. But I didn't order enough ribbon... so I haven't been able to complete all of my cards... just working on pieces of it while I wait for more ribbon to arrive. (Sidenote - Why does it seem like I'm always ordering more ribbon?! Maybe I should change to name of my blog to "Addicted to Ribbon"... )

In the meantime I'll work on more of these beauties!


Happy stamping folks... I'll be back to playing with my Pazzles soon enough...


Tuesday, October 27, 2009

Seeing 3D...

So, here it is...


My first 3D project with the new Pazzles machine! This box is only big enough to hold about a half bag of M&Ms... but that's about all it needs to hold, right?! I made this out of 12" x 12" sheet of scrapbook paper and looped through some of SU's satin ribbon, in tones of Chocolate Chip.


My box sits on the corner of my stamp table ... and doesn't have very many M&Ms left in it...

Monday, October 19, 2009

More lessons with the Pazzles...

Today's lesson on the Pazzles involved using fonts that don't work too well together when you weld them. So, the last video lesson I watched showed how to make a foundation under the letters and then create a box around the word... I like this look!


So, you'll notice, when using this font, if I had put the letters together "r" and "d" (somewhere in this word)... that the letters would have joined to the point that they wouldn't be readable. So, leaving them separated, and just creating a foundation for them to sit still gives you the option to weld them all together so that you are glueing each letter to your scrapbook page separately.

What joy this machine has brought into my life! WEEEEeeee!!!!!

Friday, October 16, 2009

Our deepest sympathy...


Some very meaningful people in our lives have recently passed away. And I found myself in need of a couple new sympathy cards. I have to admit, I really don't like making sympathy cards. I found some muted colors that were also comforting.

And I got busy with my colors and card stock and came up with this.

Les - your days were cut short in a tragic way. We hope having people around in your final days were comforting in some way. In the way you needed...

Joanne - you made a huge difference in every life you touched. We loved you tremendously! And we miss you already


Thursday, October 15, 2009

More lessons with the Pazzles...

I'm doing some more work with welding letters together... and playing with different fonts and sizes and cutting intricacies...

And at the same time I'm getting ready to work on my high school scrapbook! So, my alma mater (San Marcos High School) got to touch my Pazzles! But, be careful... that's my new toy.


So, this font I used (don't remember it's name at this point) made block style letters. And I joined the letters together and tilted them a little to the left ... and a little to the right... and then welded them together. What a great toy... I love this thing!

Off I go to keep playing... ta ta for now!

Tuesday, October 13, 2009

More lessons learned - via the Pazzles

So, today we'll look at what I call "intricacy problems"... ha!

What are we looking at? We are looking at various die cuts, in relation to a Tombow Adhesive. I included the adhesive roller in these pictures so you can understand the proportionate scale of the die cut.

Here we are looking at a leaf, a swirly-swirl and a cute lil' flower blossom. These three die cuts turned out great (except for the smallest li' holes in the middle of the flower). And the second image down is a paper clip of sorts... cute, eh?! Nice cute, too.


And here - what are we looking at? A die cut that had a problem... here is where I started seeing "intricacy problems"... see the bottom half of that flower? The final cut of the petal did not complete. I'm thinking this happened because the cutting mat had started to lose it's tackyness... or stickyness. Since the paper quit sticking to the mat, it lifted and just moved around along w/ the blade for that last little swoop of the cut. Hmph! OK... keep testing...


And here... even deeper "intricacy problems". All those individual cuts ... and some broken swirls. See the swirls across the top? The right side of those swirls are mostly un finished/broken.


So, what did I learn today? Do these intricate cuts on a larger scale and/or a tackier mat.

Off I go to shop for more mats... I have heard that it is normal for these mats to lose their tackyness rather quickly. But, this next part is key...

Most Valuable Lesson learned this week... I made a big mistake on my first run through the machine. I pushed the cardstock onto the cutting mat rather hard... and after my cut, when I pulled the cardstock back off the cutting mat... well, a lot of cardstock stayed behind. And when I worked to get it off, the adhesive started to come off the cutting mat as well.

Note to self #1: press the cardstock against the cutting mat. But DO NOT, and I mean DO NOT, press it too hard.
Note to self #2: maybe i should buy some more cutting mats.

Off to the lab to keep testing and playing and learning...


Monday, October 12, 2009

Instant Gratification - via my Pazzles

Since I put this shadow box together (from our wedding, in 2003)... I've been wanting to put something in there representing the year we got married.

So, here you have it... may I present to you(completed) project #1!!! All the rest of the elements have been in this box since early 2004... I just needed to repair some "falling" items and put the year in there.


So, let me tell you a little bit about us. If you couldn't tell, we went to Italy on our honeymoon. And the white pieces of paper in the middle of the box... that's our personalized vows ... The background (gold foil) print is wrapping paper... off of a present from my parents. The keys? Well, there is a story about the large key in the middle (the others were acquired from various antique shops in Oregon)... at some point in my single life I bought the "key to my heart"... and held on to it. As I say, I was single at the time I purchased it. And I purchased it with the hope that someday I would find the man of my dreams. (You see - this would be my second marriage. The first wasn't very dreamy... so, I was still holding out hope.) I held onto that key... I kept it in my jewelry box and looked at it daily. It was symbolic to me in so many ways...

So, when Lee proposed to me I gave him the key to my heart...

And now it hangs on our wall... but He holds me in his heart. I love you honey!

Sunday, October 11, 2009

Some more tests on the Pazzles machine...

So, it's day #3 of playing with my new Pazzles Creative Cutter... and so far here is what I've learned...

- How to create a title
- How to reset the machine
- How to join (aka "weld") letters together
- That I messed up my cutting mat in the first try through
- What different blade/pressure settings to use for SU card stock and thinner scrapbook pages
- How NOT to mess up my cutting mat the next time
- The approximate amount of intricacy on cut design (this differs depending on how stick your cutting mat is - if it's not sticky enough, more intricate designs don't work so well - watch for some pictures in future blogs)
- How to vectorize imported clip art
- What "vectorize" means...
- And that my memory isn't what it used to be... hmph! (After watching the tutorials - I have to go watch it again before I can successfully take the steps it just explained! hmph!)

So, let's start with the first few lessons... I've been watching tutorials on Pazzles.com and with the software that comes with the machine... and it's been ever so helpful! Both places for tutorials are very specific and detailed... and while I'm following it, sometimes I don't know what I'm accomplishing. Some of the instructions say "click on B"... so I do. But I don't know "WHY" I clicked on "B"... and I'm a "why" person... so, I'll keep playing and maybe eventually I'll figure it out. In the meantime... I need to get my hands on it. Play and learn... play and learn... you don't learn unless you put yourself out there.

I sat down in front of the computer, started up the software, picked my font, found some cardstock and measured it. Then I opened a new document and entered my information: size of paper. A blank screen opened in front of me... and I typed a word. I manipulated my text graphic (changing font, size of graphic, welded the letters together, etc) and clicked on "cut project". Voila...


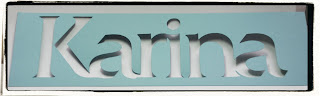
And this font is really nice... although the "K" is in two pieces (I'm not sure yet if I could've welded that to the other part of the "K" - but you know it's on my "to learn" list). This doesn't really cause a problem... because problem easily fixed. And I can use the negative image as well.... right? Looks great!


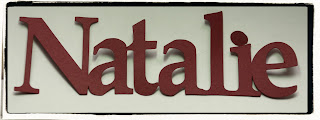
Next, I want to play with another font style. So, I pick another color of paper, measure it, create a new document... and start the process over again.


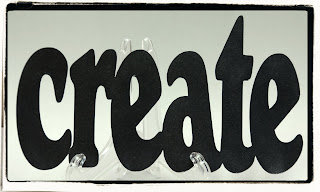
And then I wanted to make something for my desk...


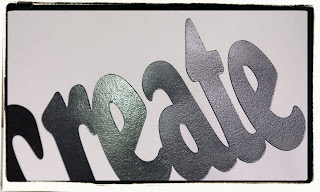
And I moved back to the stamp table... I want to give it some gloss. So, I pulled out the Versamark pad and the clear embossing powder. I hit the whole word with the Versamark pad and got it all sticky. And then dredged it through the embossing powder and hit it with the heat gun. See the gloss? I will now mount this to something near my work station...


And for today... that's enough. I learned, I cut, I conquered... stay tuned for more from my new Pazzles studio...

The Story of my new Pazzles...

Several months ago I started to save up my hard-earned pennies to buy myself a Cricut... my creative brain was longing for something new to play with. And I had the opportunity to try one out at a creative getaway I went to around the same time.

At the end of the 2 days I was convinced... the Cricut was definitely what I wanted! (Thanks Mila - for letting me touch and use and drool all over your Cricut! My childhood scrapbook looks so much better for it!!!) And I came home and told my hubby about it... and he started researching... here is a sample of one of the words I did...


In my childhood scrapbook I was able to leave behind one word memory triggers on each layout ... and it added such a great touch to my scrapbook!


Fast forward... a few weeks later I brought it up in conversation again (still saving my pennies)... and he said "Oh - I forgot to tell you... I found something else you should look up. It's by Pazzles... it's called an 'Inspiration Creative Cutter'." He went on to explain it can also cut out text and shapes and images, etc... but you hook it up to your computer and you can manipulate the images a bit more. It can also dry emboss, pierce, weld words together... really, since you're doing the manipulation of the image, you are only limited to your imagination.

So, I kept saving up for it... and then went for it. Retail price is $600. But being so cheap... I only paid $479 for it and found a coupon for FREE SHIPPING! (Thanks to Deb! Thanks for talking me into it!) HA! Power to the coupon collectors! Plus, I had a $50 coupon for Joanns from a friend... and so, I went shopping for my birthday! (Bad habit, I know - but I LOVE, LOVE, LOVE buying my own birthday present! How about you?!)

So, here is one of my first creations from my new Creative Cutter...


It's a rather small cut project, but it's welded! And that's more than I could do with the Cricut I took for a test drive. So, I feel like I'm already up one... and moving closer to what I envision my creations to look like. But this is just a taste of it... there is much more to come. So, stay tuned... I've got some good stuff on the horizon!


Tuesday, October 6, 2009

Happy Birthday to ME!!!

So, look what I bought myself for my birthday!!!!!


My new Pazzles Inspiration Cutter is expected to arrive on Friday! Can you guess what I'll be doing this weekend?! I'm already giddy... already watching tutorials... already dreaming about designs and ideas and projects... I can't wait to put my Stampin' Up! card stock and Designer Series Paper in here and P-L-A-Y!!!

Stay tuned... more to come soon.... very soon!