 Image 1.
SUPPLIES: You will need an 8 ½” x 11” inch sheet of Stampin’ Up! Designer Series Paper, bone folder, scissors, and additional embellishments or cardstock for pocket inserts.
 Image 2.
Step 1: Fold paper in half with bone folder to make deep crease.
 Image 3.
Step 2: Open folded paper, and fold in half lengthwise. Again, use bone folder to make deep crease. Unfold and lay flat on work space, lengthwise.
(Editor’s note: through the rest of the tutorial I will be referring to the four different equal-sized sections of cardstock by “Panel A”, “Panel B”, “Panel C” and “Panel D”. Going clockwise, the top LEFT corner is Panel A. Directly to the RIGHT of Panel A is Panel B. Directly UNDERNEATH Panel B is Panel C. Directly to the LEFT of Panel C is Panel D.)
 Image 4.
Step 3: You will now make the only cut involved in making this card. Where the bone folder in Image 4 is lying, the crease between Panels B and C – cut along crease to the middle of the page. Put the scissors away – you will not need them again!
 Image 5.
Step 4: On Panel C, fold bottom right corner up towards center of page, keeping about ¾” from crease in center of page.
 Image 6.
Step 5: On Panel A, fold top left corner down towards center of page, keeping about 1/16” from crease in center of page. (Note: you want to get very close to the crease, but if you fold too close it will be hard to make the final folds.)
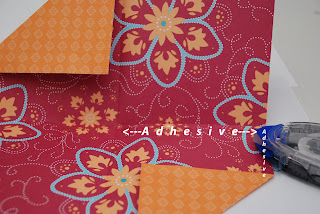 Image 7.
Step 6: On Panel C, run your adhesive* along cut edge (top edge of Panel C), and down edge of sheet, to the fold. (*See last image in this series for additional guidance on where to place adhesive.)
 Image 8.
Step 7: On Panel A, run your adhesive along bottom of panel, and up right side. (See last image in this series for additional guidance on where to place adhesive.)
 Image 9.
Step 8: fold Panel C over on top of Panel D.
 Image 10.
Step 9: On Panel A, fold top corner down towards center of page.
 Image 11.
Step 10: fold Panel D upwards, over Panel A. You are now looking at the inside of the card.
 Image 12.
Step 11: Close card.
Step 12: At this point you can add any additional embellishments, prepare cardstock inserts for each of the two pockets on the front or inside the card, etc.
 Image 13. Final product looking mighty schnazzy!
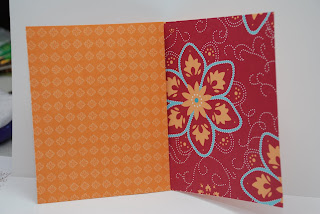
Image 14. And one more look inside.

*Supplemental image - for further assistance on placement of adhesive.
(Prepared by Lori Tisdale. Copyright Stampin’ Up! 1999 – 2008)
1 comment:
What a great tutorial!! If I can ever find my craft room, I'm going to give it a try!
Thanks Lori!!
Post a Comment